Edit Session
The Edit Session window is organized into three tabs: Tracks, Default Parameters, and Globals. The Tracks tab is where you will configure the number of tracks you want and what type (audio or MIDI) they are, and where you set track override parameters. The Default Parameters tab is where you set all of the parameters in the session defaults layer described above. The Globals tab is where you define parameters for things such as the Transport which is shared by all tracks.
Parameter Trees
There are lots and lots of parameters that can be set in the session. To help locate the ones you want, parameter names are organized into a tree view which is similar to a file browser. You will see parameter trees in a number of places in the UI and they all behave in the same way.
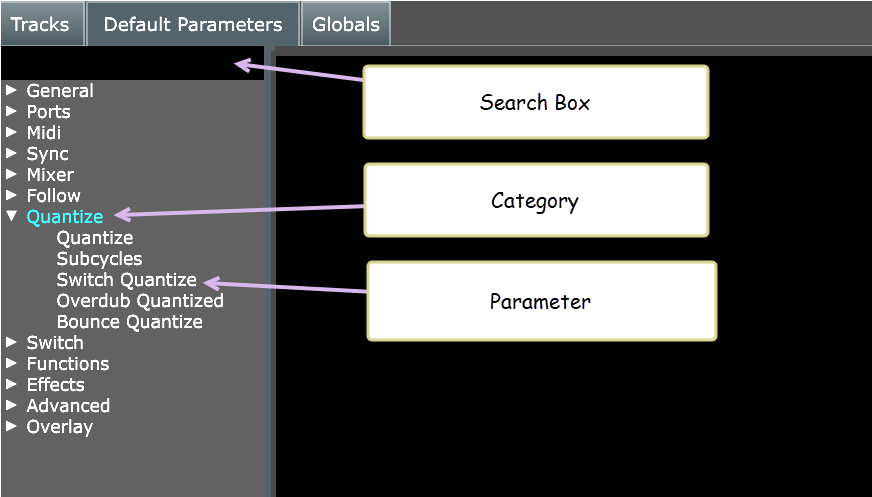
The tree contains a number of category names that you expand using the little triangles. Within each category may be other categories, or the names of individual parameters. When you click on a category or parameter name, a form is displayed to the right of the tree where you can edit the parameters in that category.
At the top of the parameter tree is the search box. When you type a word in the search box, the tree will close and expand categories to display only those parameters whose names contain the word you have entered. This can help locating a parameter whose name you might know but forget what category it is under. Deleting the words in the search box will restore the tree to it’s normal form where categories are expanded manually.
Parameter Forms
When you click on an item in a parameter tree a form is displayed to the right of the tree containing the parameters in that category.
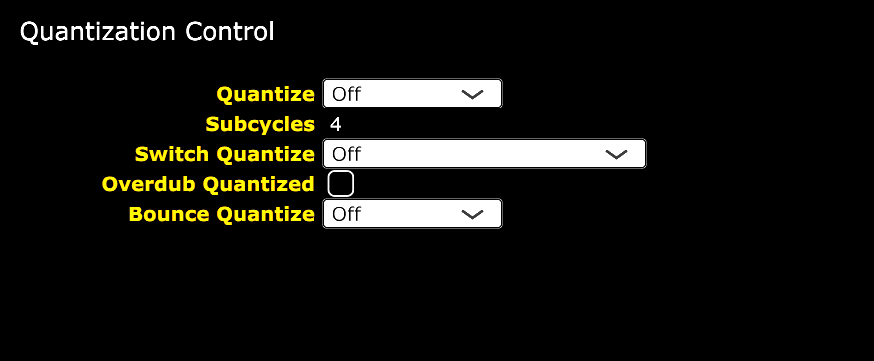
To change the value of a parameter, click on it’s current value in the parameter form. Many parameters are edited with text input fields, in this example Subcycles has a text field containing the number 4. Some parameters are edited with “combo box” menus that only allow you to select from a set of pre-defined values. A few such as Overdub Quantized can only have an on or off state and are edited with checkboxes. Click on the rounded rectangle to turn the check on and off.
In some forms you will notice that the parameter names have different colors. The color determines whether this parameter is included in the layer you are editing and can be changed. If the label color is bright, it may be edited. If it is dark, it is not included in the layer and must be activated by clicking on the label.
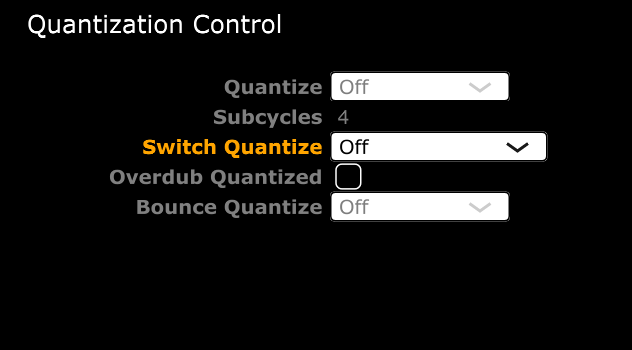
In the previous example, only the Switch Quantize parameter is included in this layer. The others are not and are disabled.
If it is a pale red color, it means the parameter is being occluded by the presence of an overlay. Hovering over the label will popup a tool tip that contains the name of the overlay that is occluding this parameter. This is discussed in more detail later. This is sometimes also referred to as “shadowing” or “hiding” the parameter.

The value shown for an occluded parameter is the value that comes from the overlay so you can see exactly what the effective value will be, which may be different than the default value defined in the session.
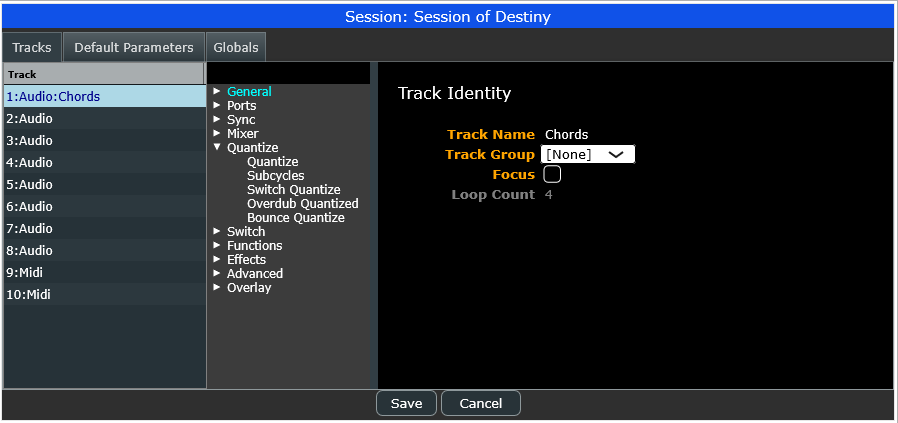
Track Table
The Tracks tab is where you will spend most of your time. This is where you define how many tracks of each type you want to use, the order in which they are displayed, and set the parameters that may be different for each track in the track overrides layer. On the left is the track table, in the center is a parameter tree, and on the right are the parameter forms.
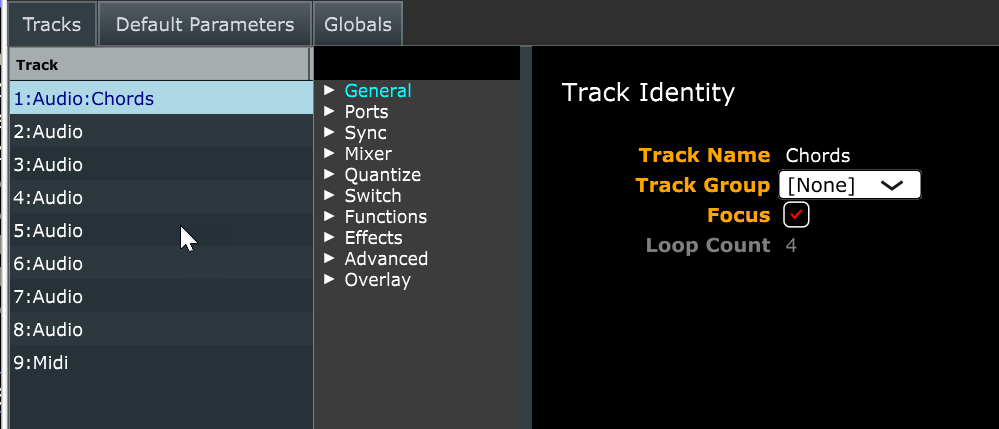
The track table lists all of the currently configured tracks using the pattern:
1:Audio:
All tracks have a unique number starting from 1. You cannot assign track numbers, they are defined by the order in which tracks appear in the track table. Next to the track number is the track type. Currently this will always be either “Audio” or “Midi”, though future releases will be adding more track types. Finally the track name is included if you have set the track name. If the track is not named, it will display only the number and type.
Track numbers have historically been used to identify tracks in bindings and scripts. This is still the case, but now that sessions contain tracks of different types which you can order however you like, identifying tracks by number can lead to confusion if you are not careful. Bindings are not currently “inside” the session. Bindings are global and apply to all sessions. So a binding for track number 1 in one session may not behave the same in a different session if track number 1 isn’t of the same track type (audio or midi).
In future releases, bindings will be allowed to reference tracks in different, more reliable ways. Until then, if you want a mixture of audio and MIDI tracks, it is recommended that you follow the convention of putting all of the audio tracks first, followed by any MIDI tracks.
When a track row is highlighted, right clicking the mouse will bring up a popup menu.
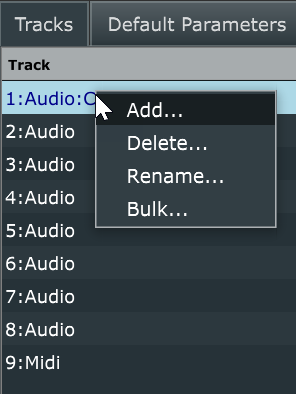
The Add item will add a new track, prompting you to select a type. Once you have added tracks, you can reorder them by clicking and dragging them in the table. If you mix tracks of different types, it is recommended that you give them names to help identify them. A track name may be specified in two ways, using the Rename item in the popup menu, or by selecting the General category in the parameter tree and editing the Track Name field.
The Delete item deletes a single track.
The Bulk item provides a way to add or remove several tracks at once. You are prompted for the number of tracks of each type. If the number of tracks is higher than it is now, new tracks will be added after the existing tracks. If the number of tracks is higher than it is now, tracks will be deleted. Note that when deleting tracks in bulk, tracks with the higher numbers are removed first. After adding or deleting tracks in bulk, all tracks are renumbered which may impact bindings.
Track Override Parameters
Recall that each track has a track overrides layer that may include parameters that override the values found in the session defaults layer. After selecting a track in the track table, a parameter tree and form will be displayed containing only the values in the overrides layer for the selected track.
As mentioned earlier, many of the parameter labels in track forms will be dark meaning the parameter is not being overridden and it will show the default value. To override a parameter click on the label so that it becomes bright and the value may be modified.
It is best to keep the number of parameters a track overrides to a minimum. If you find that you no longer need to override a parameter and can simply use the session default, click on the label so that it turns dark again and it will display the default value.
As you select other tracks in the track table, the tree and the forms will change to show the parameter overrides for that track. You may edit as many tracks as necessary, you do not need to click the Save button for every track, just once when you finished editing the entire session and are ready to start using it.
There will be slightly different parameter trees and parameter forms for Audio and MIDI tracks since not all of the parameters available for MIDI tracks apply to audio tracks and vice versa.
For details on MIDI track parameters see Using Midi Tracks