Transport Control
While the Session contains the starting parameters for the transport, to use it you will need to add the Transport Element to the user interface. Since this is a new feature it is not visible by default. To add it, go to the Display menu and select Edit Layouts. Then under the Main Elements tab, drag the element named “Transport” from the right side to the left. Click Save. Like other UI elements, the Transport can be moved around by clicking on it and dragging it, and it can be resized by clicking and dragging on the border.
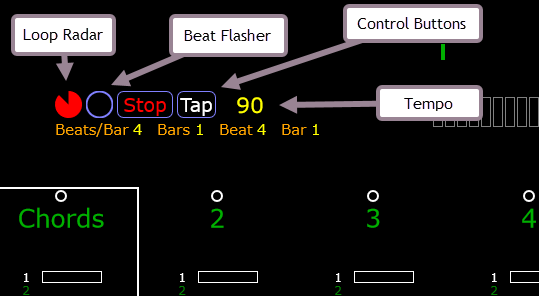
The Transport Element contains several subcomponents that, being a science nerd, I’ll call “atoms”. The atoms are arranged in two rows. The top row contains the Loop Radar, Beat Flasher, Stop Button, Tap Tempo Button, and Tempo Display. The bottom row contains information about the Beats Per Bar, Bars Per Loop, the current beat within the bar, and the current bar within the loop.
You start the transport playing by pressing the Start button. While playing the text inside the button changes to Stop and clicking on it again will stop the transport. The Tap button can be used to enter a tempo by clicking on it twice. The current transport tempo is displayed to the right of the Tap button. The range of tempos you can enter is constrained by the Min Tempo and Max Tempo session parameters. If you tap a tempo outside this range it will be doubled or halved until it fits within this range.
While the transport is playing the Loop Radar will fill with color, similar to the loop radar in a track. As the transport crosses beat, bar, or loop boundaries, the Beat Flasher will flash: green on each beat, yellow on each bar, and red on each loop.